AI Model Configuration
Prefer to watch? This tutorial is also available as a video.
mindzieStudio now offers dramatically improved large language model (LLM) integration, giving you flexible options to power your AI copilots and assistants. You can use mindzie's built-in proxy models, connect to popular cloud providers with your own API keys, or deploy on-premise models for complete control.
Overview
The AI model configuration system allows you to:
- Use mindzie Proxy Models: Access fast and thinking models provided by mindzieStudio out of the box
- Bring Your Own Models: Connect to any OpenAI-compatible API with your own credentials
- Cloud Providers: Use OpenAI, OpenRouter, Grok, Gemini, and other major AI providers
- On-Premise Deployment: Deploy local models using LM Studio, Ollama, or similar platforms
- Automatic Detection: Let mindzieStudio automatically detect model capabilities, token limits, and features
- Multiple Models: Configure as many models as needed for different use cases
When to Use AI Model Configuration
Configure AI models when you need to:
- Set up copilot assistants for the first time
- Switch between different AI providers based on cost or performance
- Deploy on-premise models for data privacy and security
- Use specialized models for specific tasks (fast models for quick responses, thinking models for complex analysis)
- Rotate API keys for security compliance
- Test new models before making them the default
Prerequisites
Before configuring AI models:
- Administrator Access: You must have administrative access to mindzieStudio settings
- API Keys: Obtain API keys from your chosen provider (OpenAI, OpenRouter, etc.)
- Provider Account: Create an account with your AI provider if using external services
- On-Premise Setup: If using local models, install and configure LM Studio, Ollama, or equivalent software
Accessing Copilot Settings
Navigate to the copilot settings through the administration panel.
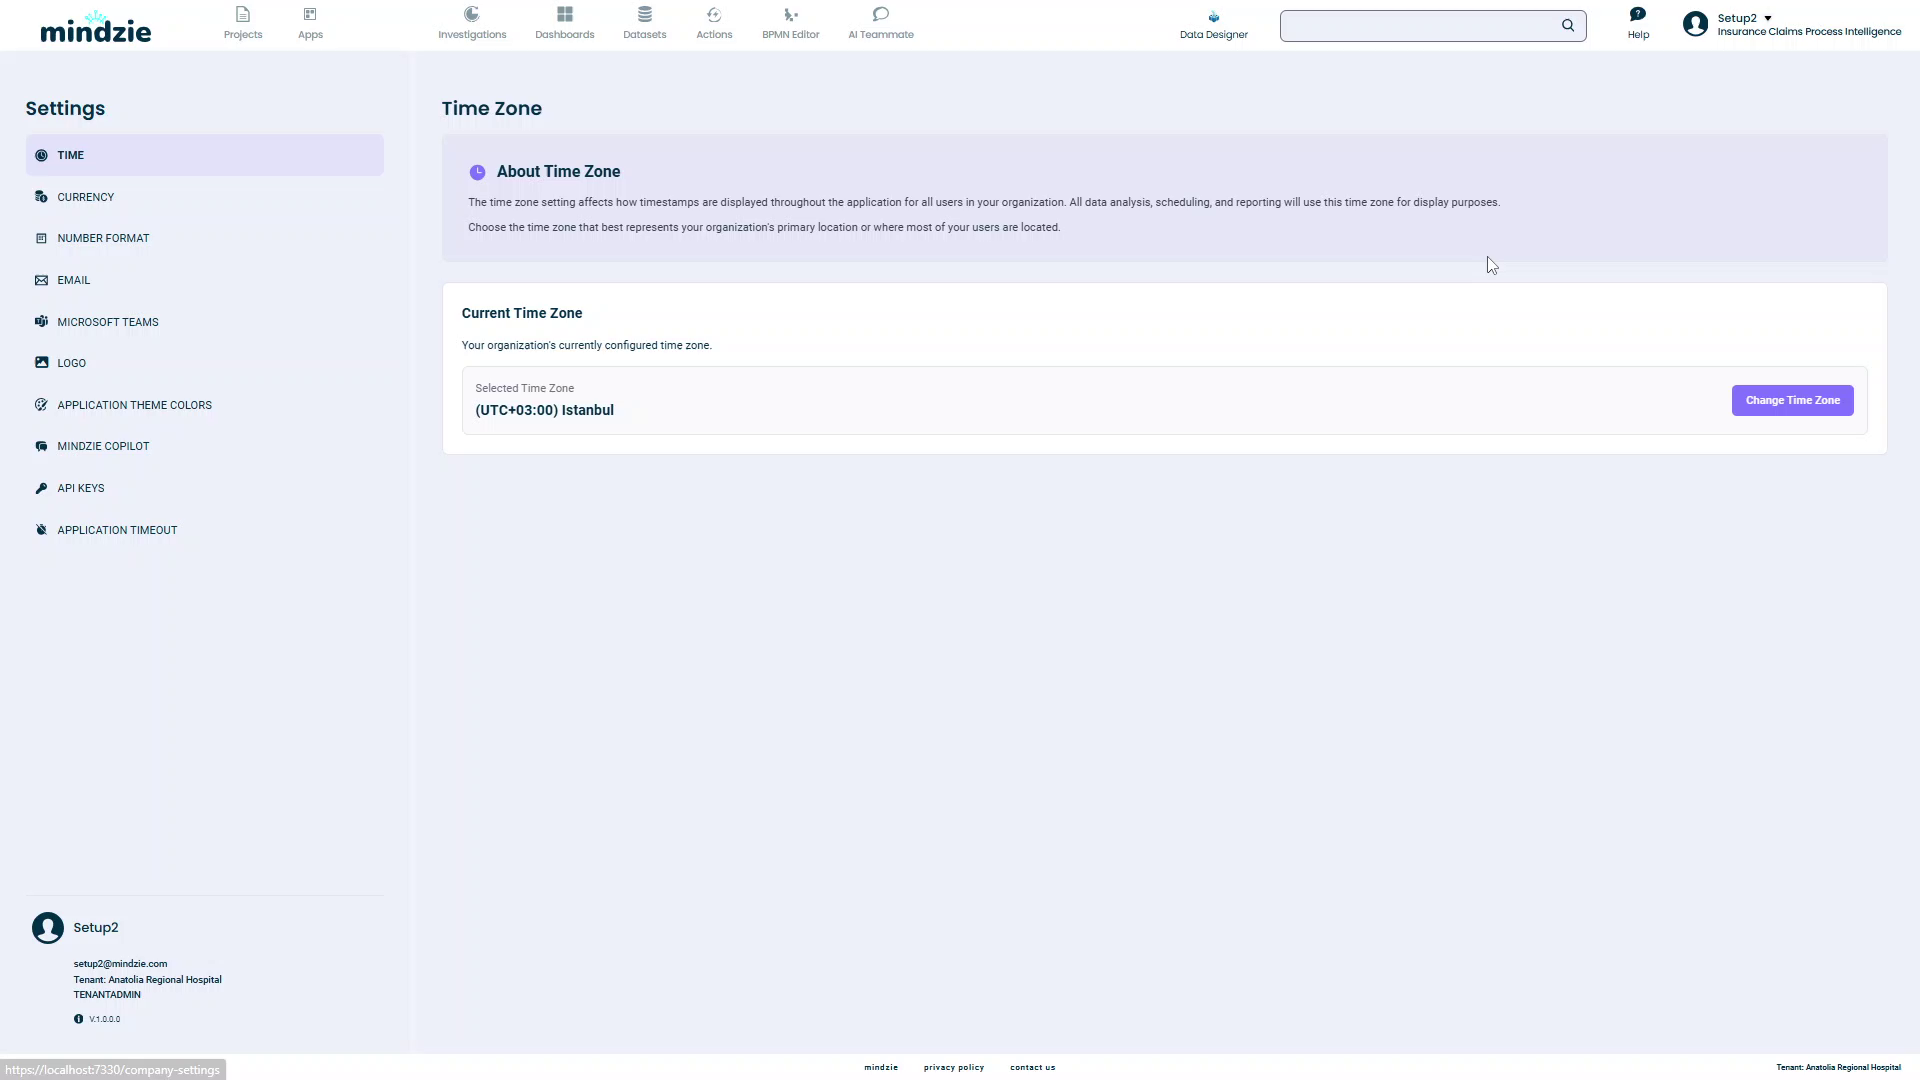
- Click your profile icon in the top-right corner
- Select Settings from the dropdown menu
- In the left sidebar, click Copilot
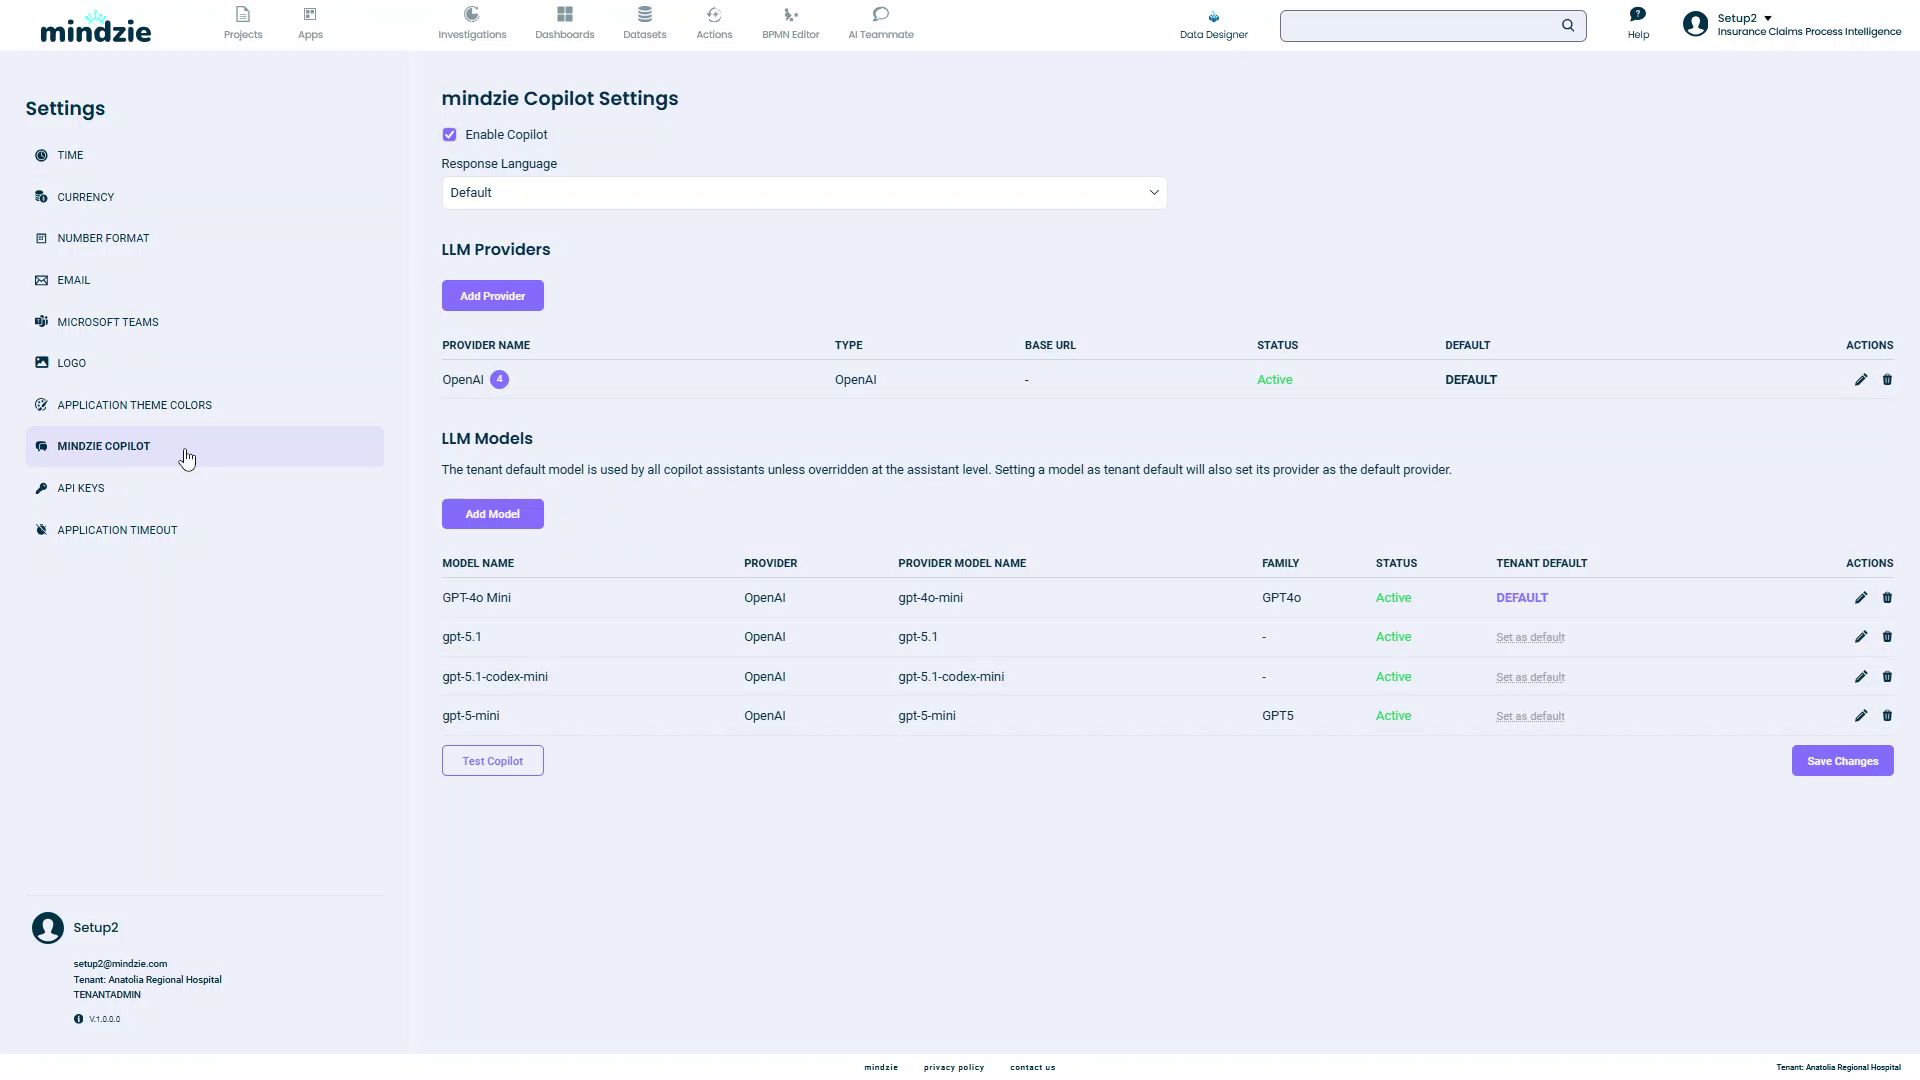
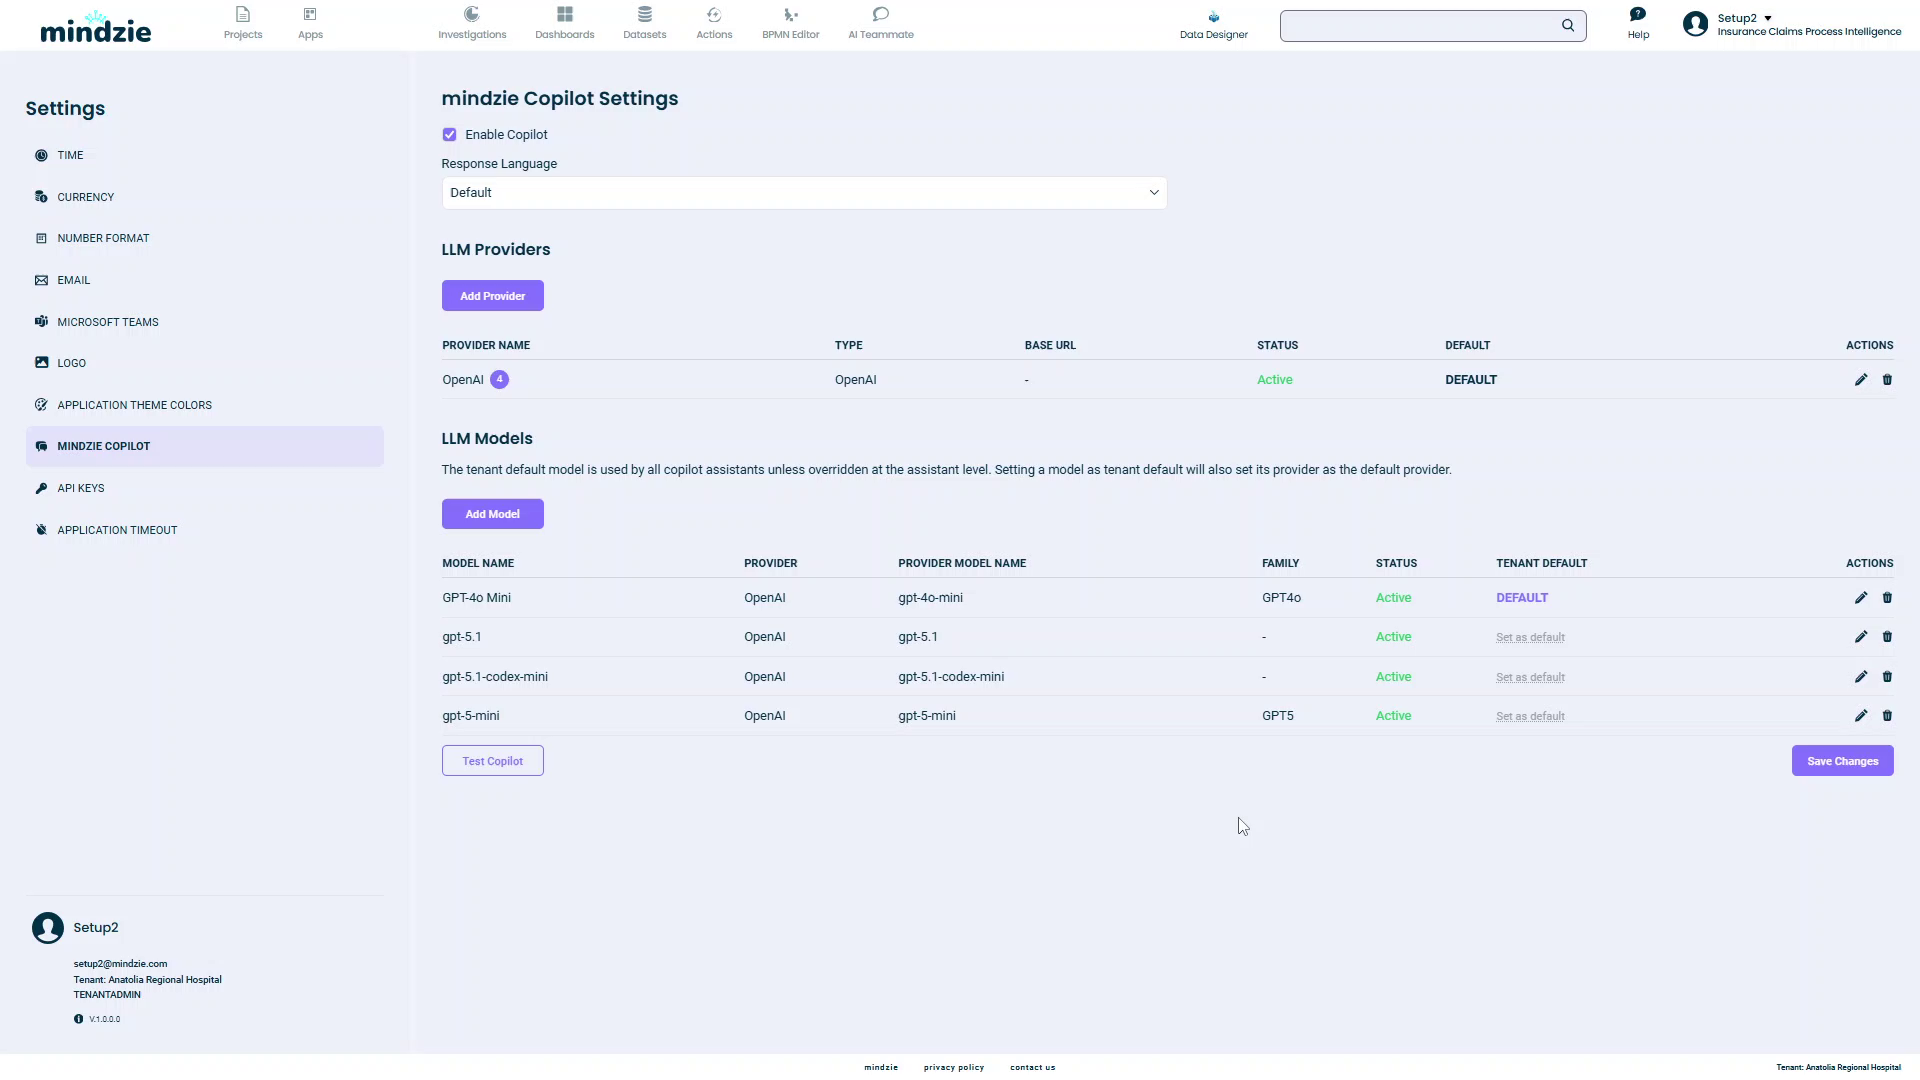
You will see the mindzie Copilot Settings page with two main sections:
- LLM Providers: Manage your AI service providers
- LLM Models: Configure specific models from your providers
Adding an AI Provider
Providers are the AI services that host the models. You can add multiple providers and switch between them.
Step 1: Open Add Provider Dialog
- Click the Add Provider button in the LLM Providers section
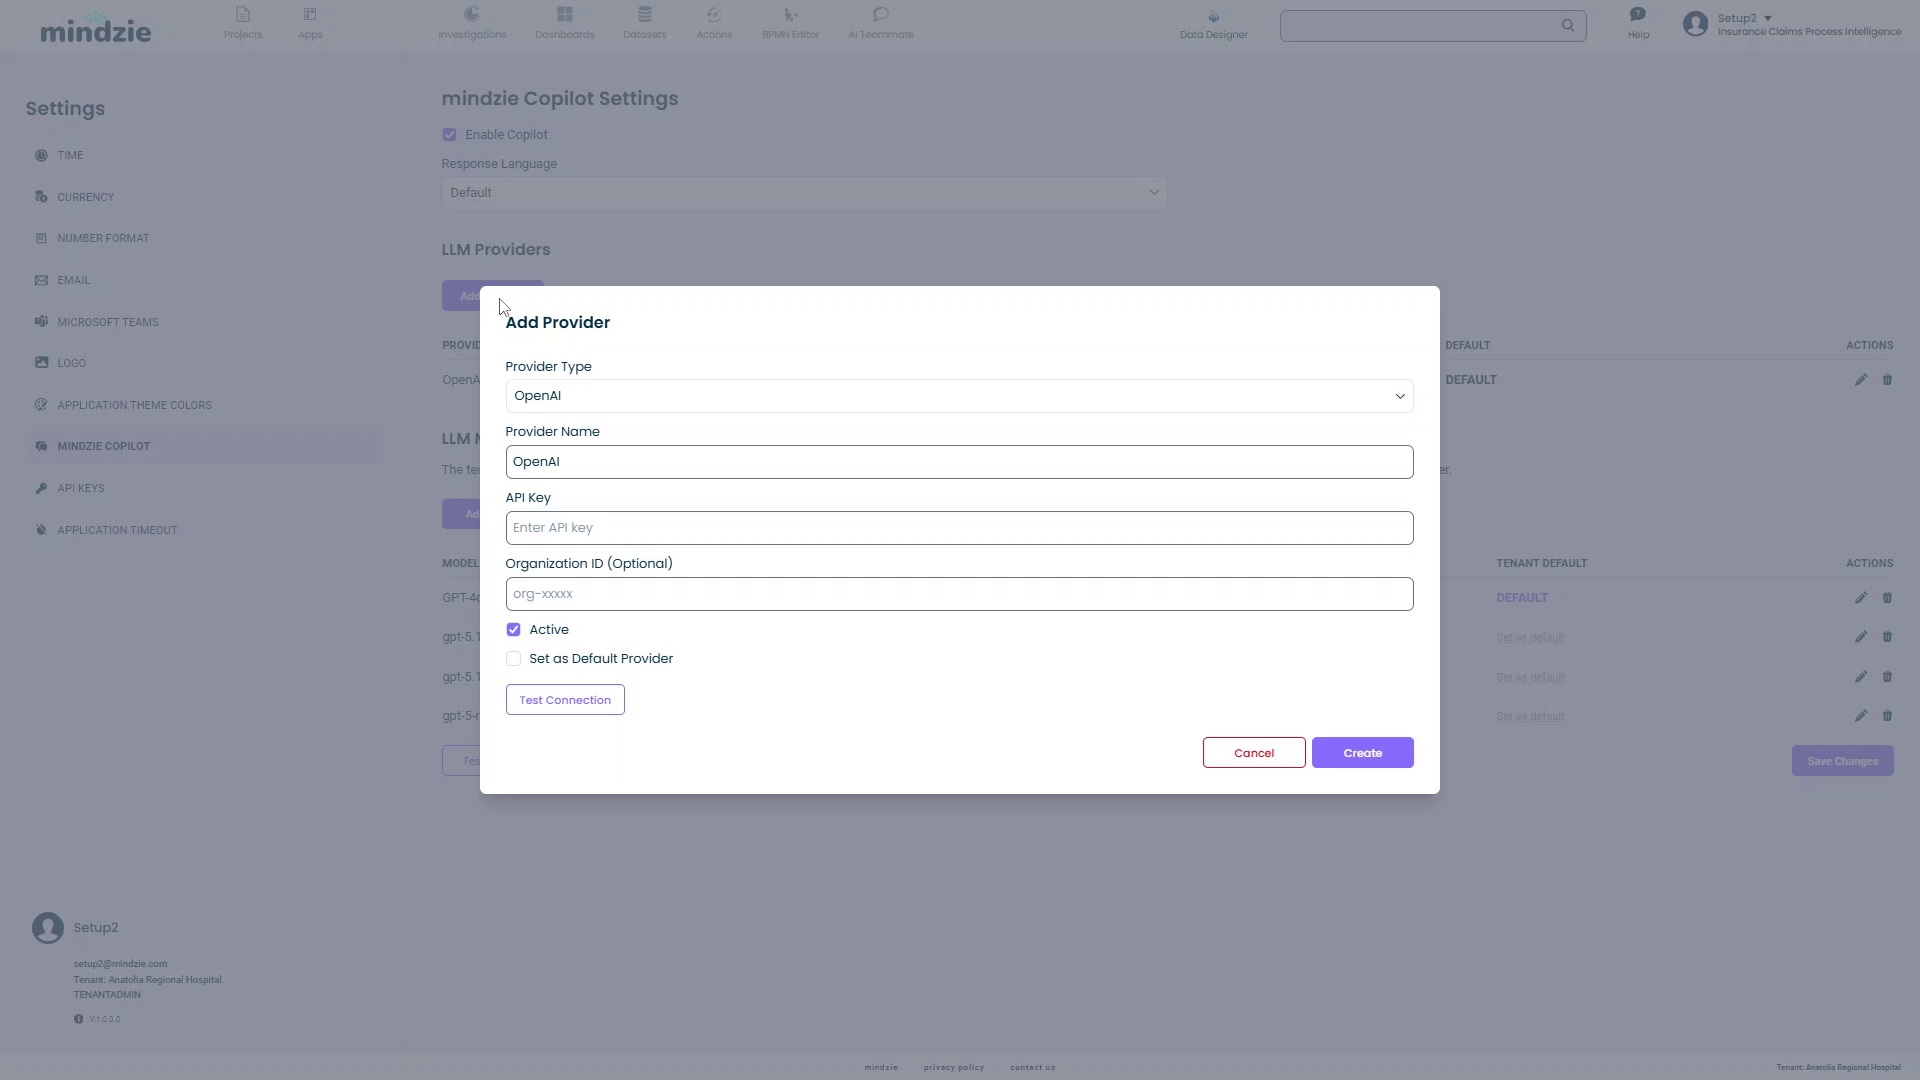
- The Add Provider dialog will open
Step 2: Select Provider Type
Choose from the Provider Type dropdown:
- OpenAI: Official OpenAI API (GPT-4, GPT-3.5, etc.)
- AzureOpenAI: OpenAI models hosted on Microsoft Azure
- Anthropic: Anthropic's Claude models
- Google: Google's Gemini models
- OpenRouter: Access to multiple models through OpenRouter
- LMStudio: Local deployment using LM Studio
- Other: Any other OpenAI-compatible API (use this for Ollama, xAI Grok, and similar — supply the base URL)
Note: For well-known providers, mindzieStudio automatically knows the base URL. For local deployments or custom providers, choose Other and supply the base URL.
Step 3: Configure Provider Details
Provider Name: Enter a descriptive name for this provider (e.g., "OpenAI Production", "Local LM Studio")
API Key: Enter your API key from the provider
- For cloud providers, obtain this from your provider's dashboard
- For local deployments, this may not be required or can be left empty
Organization ID (Optional): Some providers like OpenAI support organization IDs for billing and access control
Base URL (Optional): For custom or local deployments
- LM Studio example:
http://localhost:1234/v1 - Ollama example:
http://localhost:11434/v1 - Custom API: Your server's API endpoint
Step 4: Set Provider Status
Active: Check this box to enable the provider
- Uncheck to temporarily disable without deleting the configuration
- Useful when you want to pause usage but keep your API keys stored
Set as Default Provider: Check this box to make this provider the default
- The default provider is used when adding new models
- Simplifies configuration when you primarily use one provider
Step 5: Test the Connection
Before saving, test that your provider is configured correctly.
- Click the Test Connection button
- mindzieStudio will attempt to connect to the provider using your credentials
- A success or error message will appear
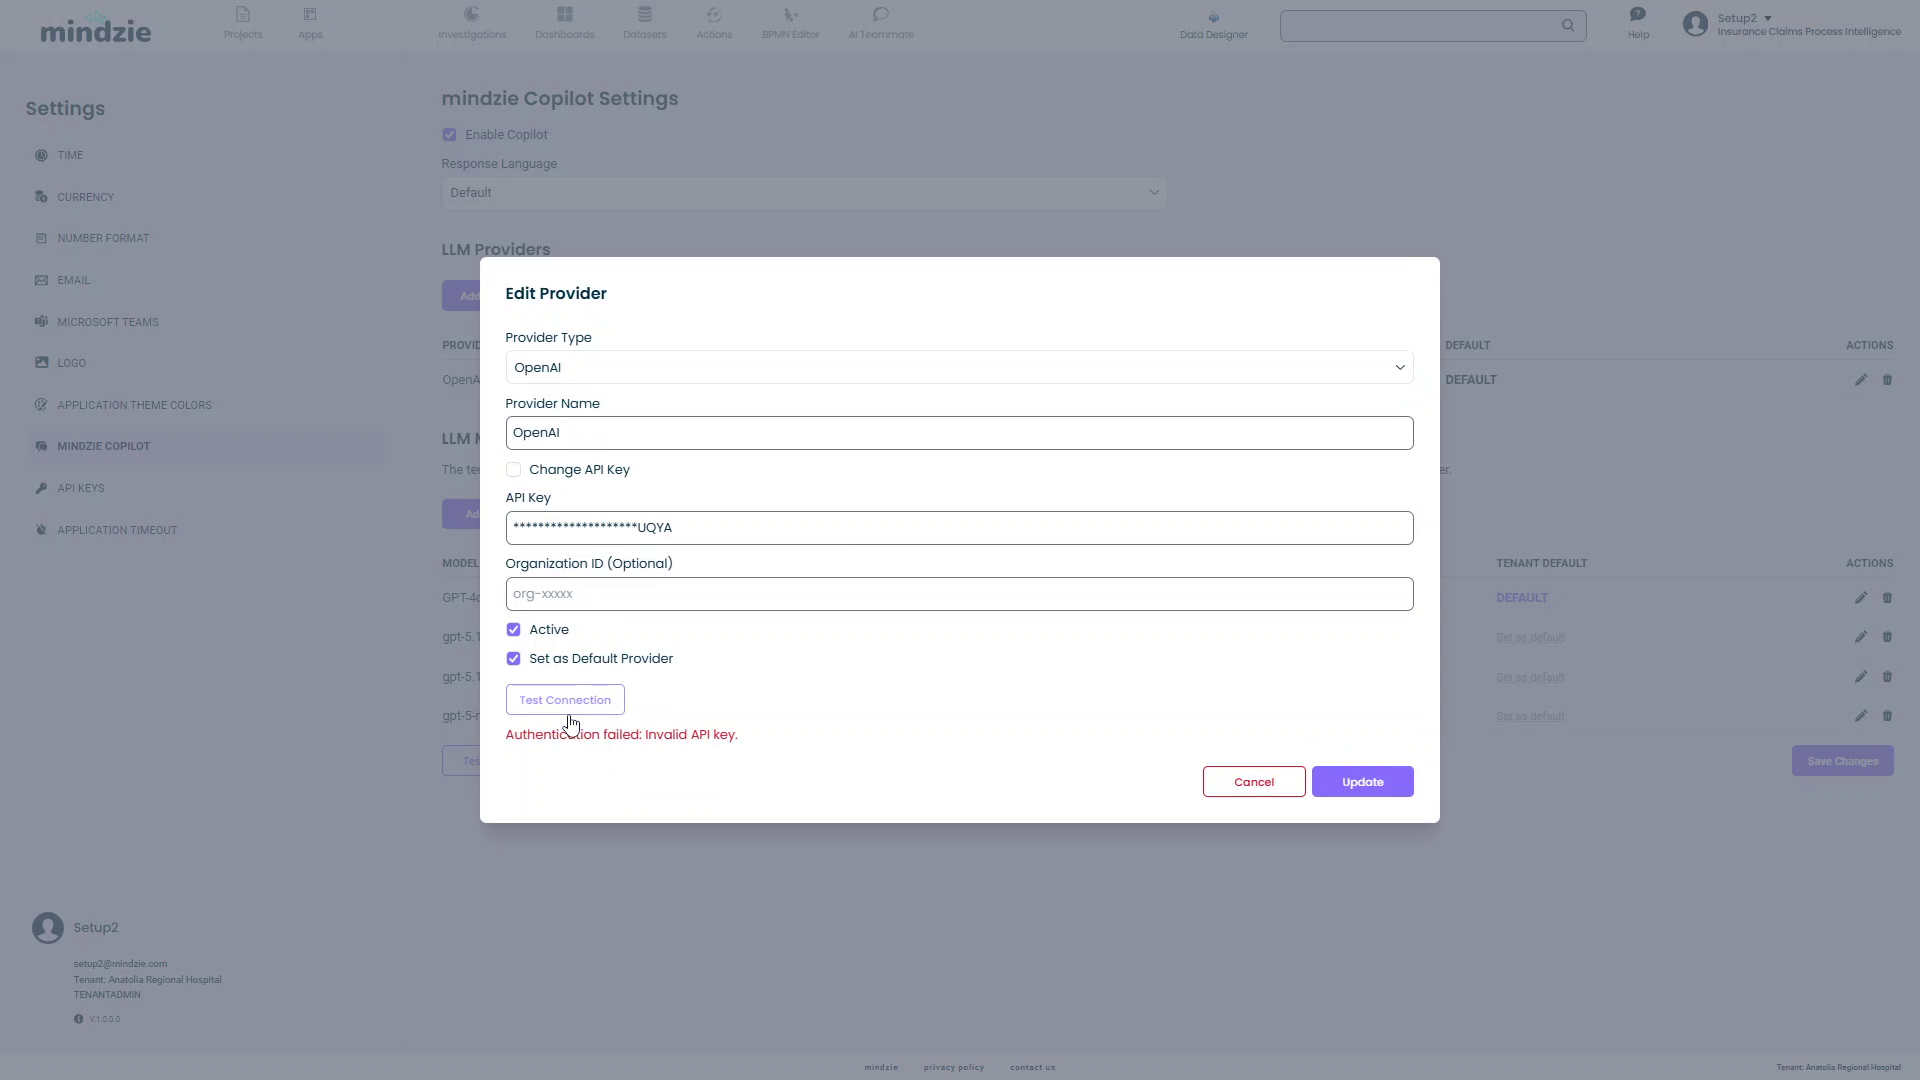
Note: If you see "Authentication failed: Invalid API key", verify your API key is correct and has not expired.
Step 6: Save the Provider
Click Create to save the provider configuration.
Your provider will now appear in the LLM Providers table.
Managing Existing Providers
Editing a Provider
To update provider settings (such as rotating an API key):
- Click the edit icon (pencil) in the Actions column
- The Edit Provider dialog opens with current settings
- Make your changes (e.g., update the API key)
- Click Test Connection to verify the new credentials
- Click Update to save changes
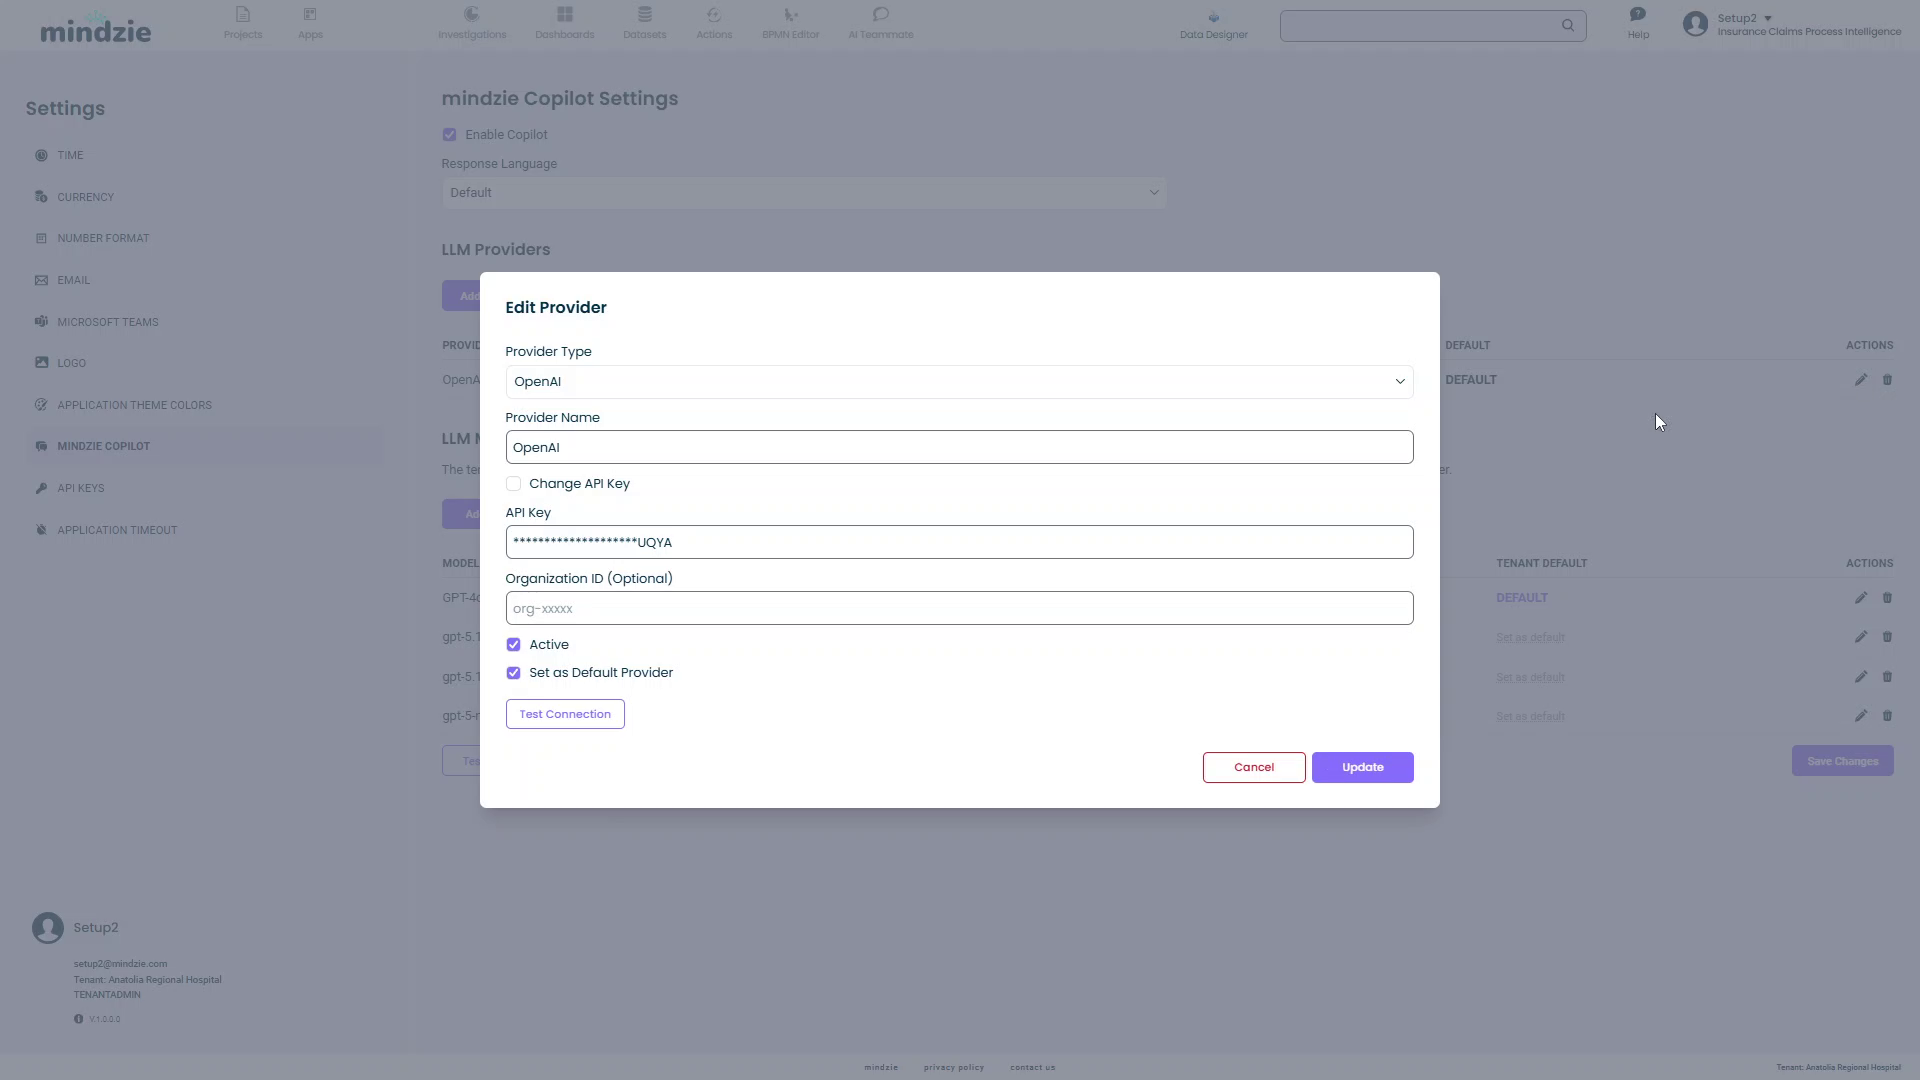
Common Use Case: API keys may need rotation based on your IT department's security policies. Use the Edit Provider function to update keys without recreating the entire configuration.
Deleting a Provider
To remove a provider:
- Click the delete icon (trash can) in the Actions column
- Confirm the deletion
Warning: Deleting a provider will not delete associated models, but those models will no longer function without a valid provider.
Adding a Model
Once you have configured at least one provider, you can add AI models.
Step 1: Open Add Model Dialog
- Click the Add Model button in the LLM Models section
- The Add Model dialog will open
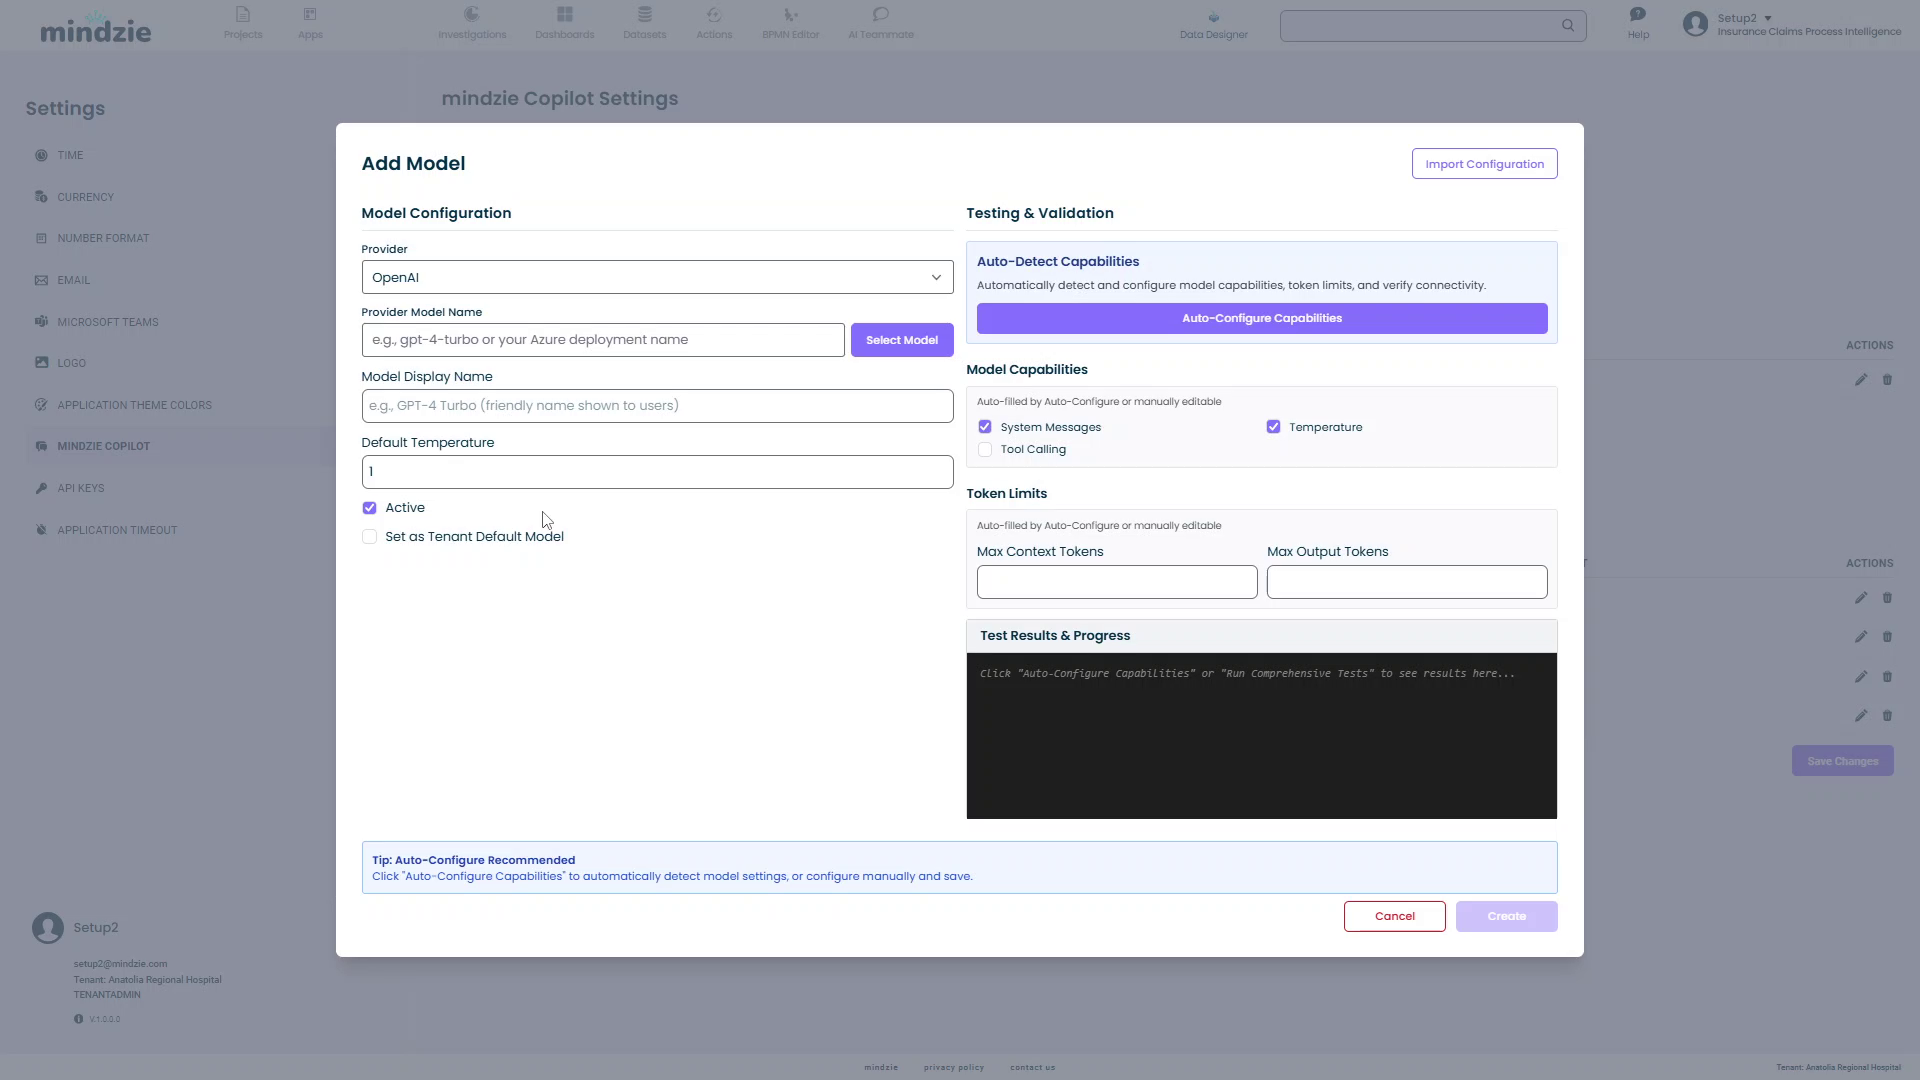
The dialog has two main sections:
- Model Configuration (left): Basic model settings
- Testing & Validation (right): Automatic capability detection
Step 2: Select Provider
Choose the Provider from the dropdown menu.
This dropdown lists all active providers you've configured.
Step 3: Select or Enter Model Name
You have two options for specifying the model:
Option A: Select from List (Recommended)
- Click the Select Model button next to the Provider Model Name field
- A Select Model dialog will appear with a search box
- mindzieStudio will query the provider's API to get available models
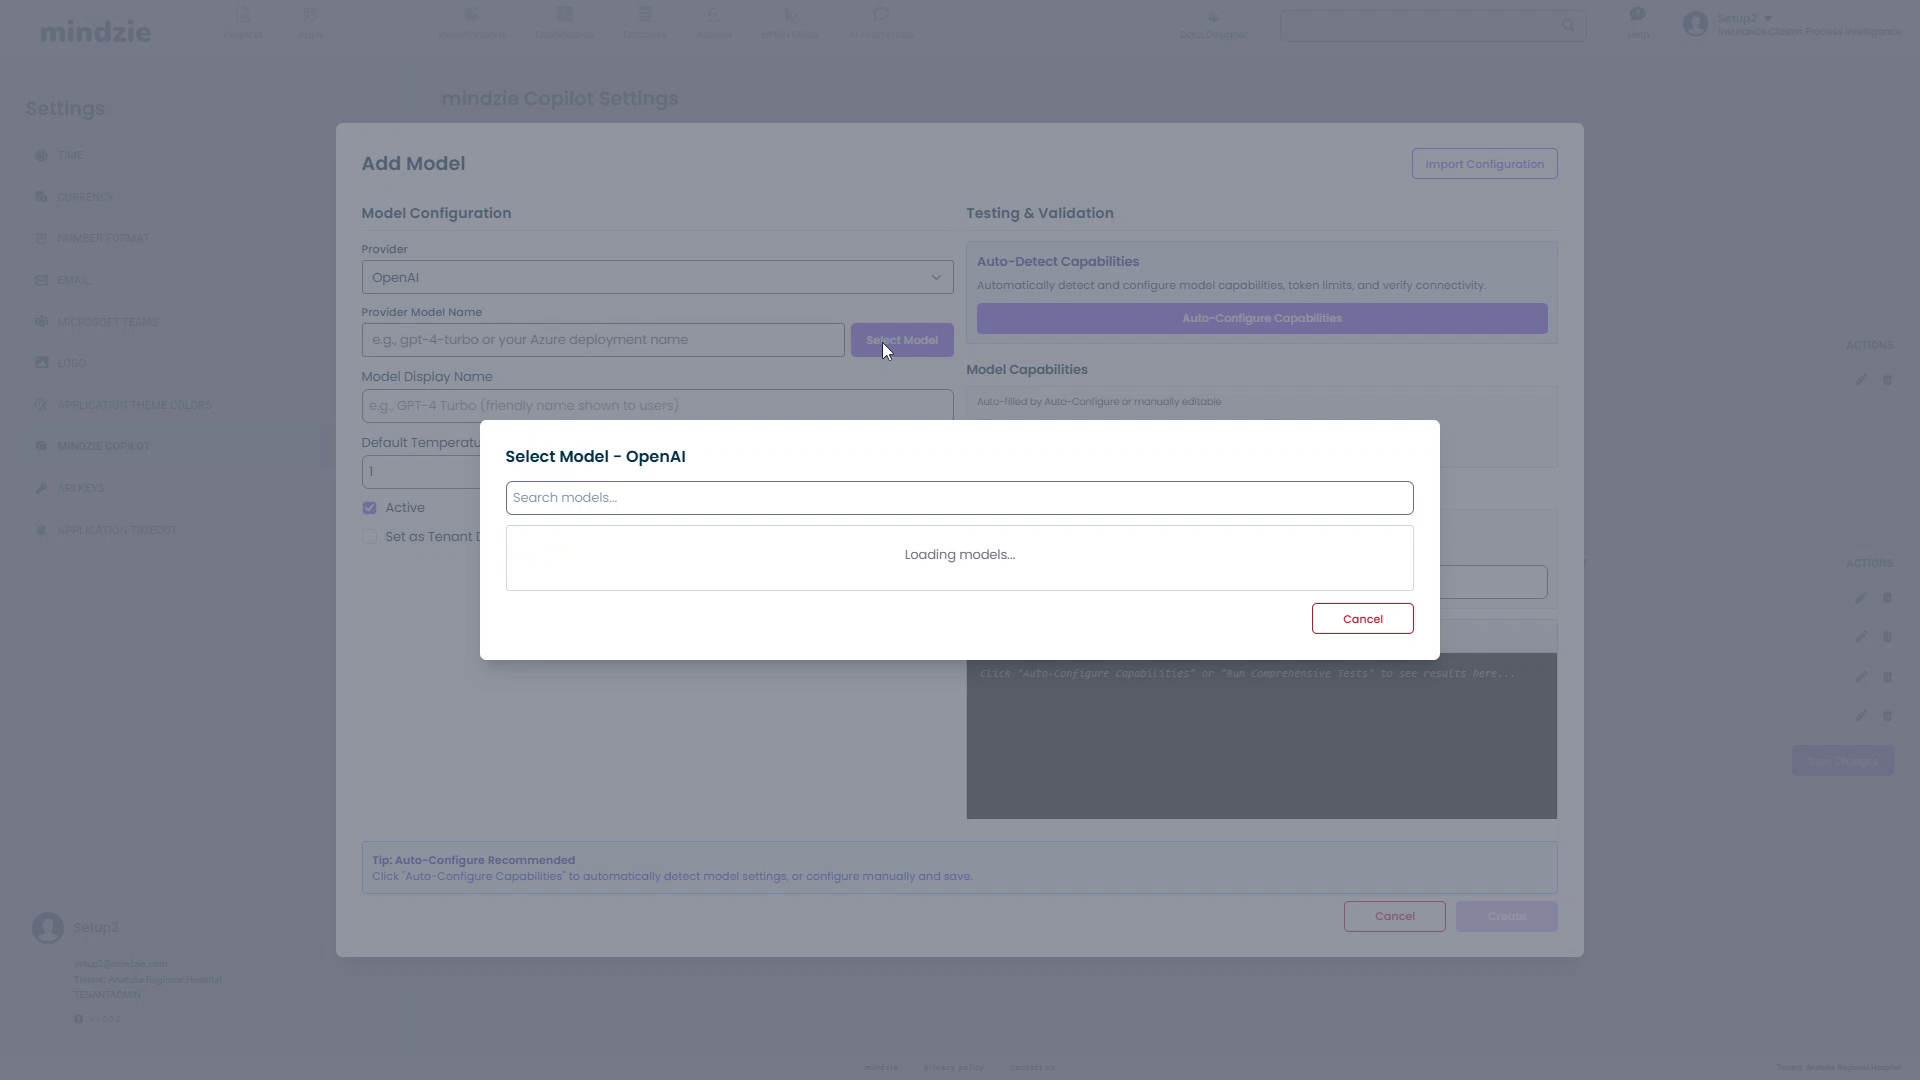
- Once loaded, you'll see a list of available models
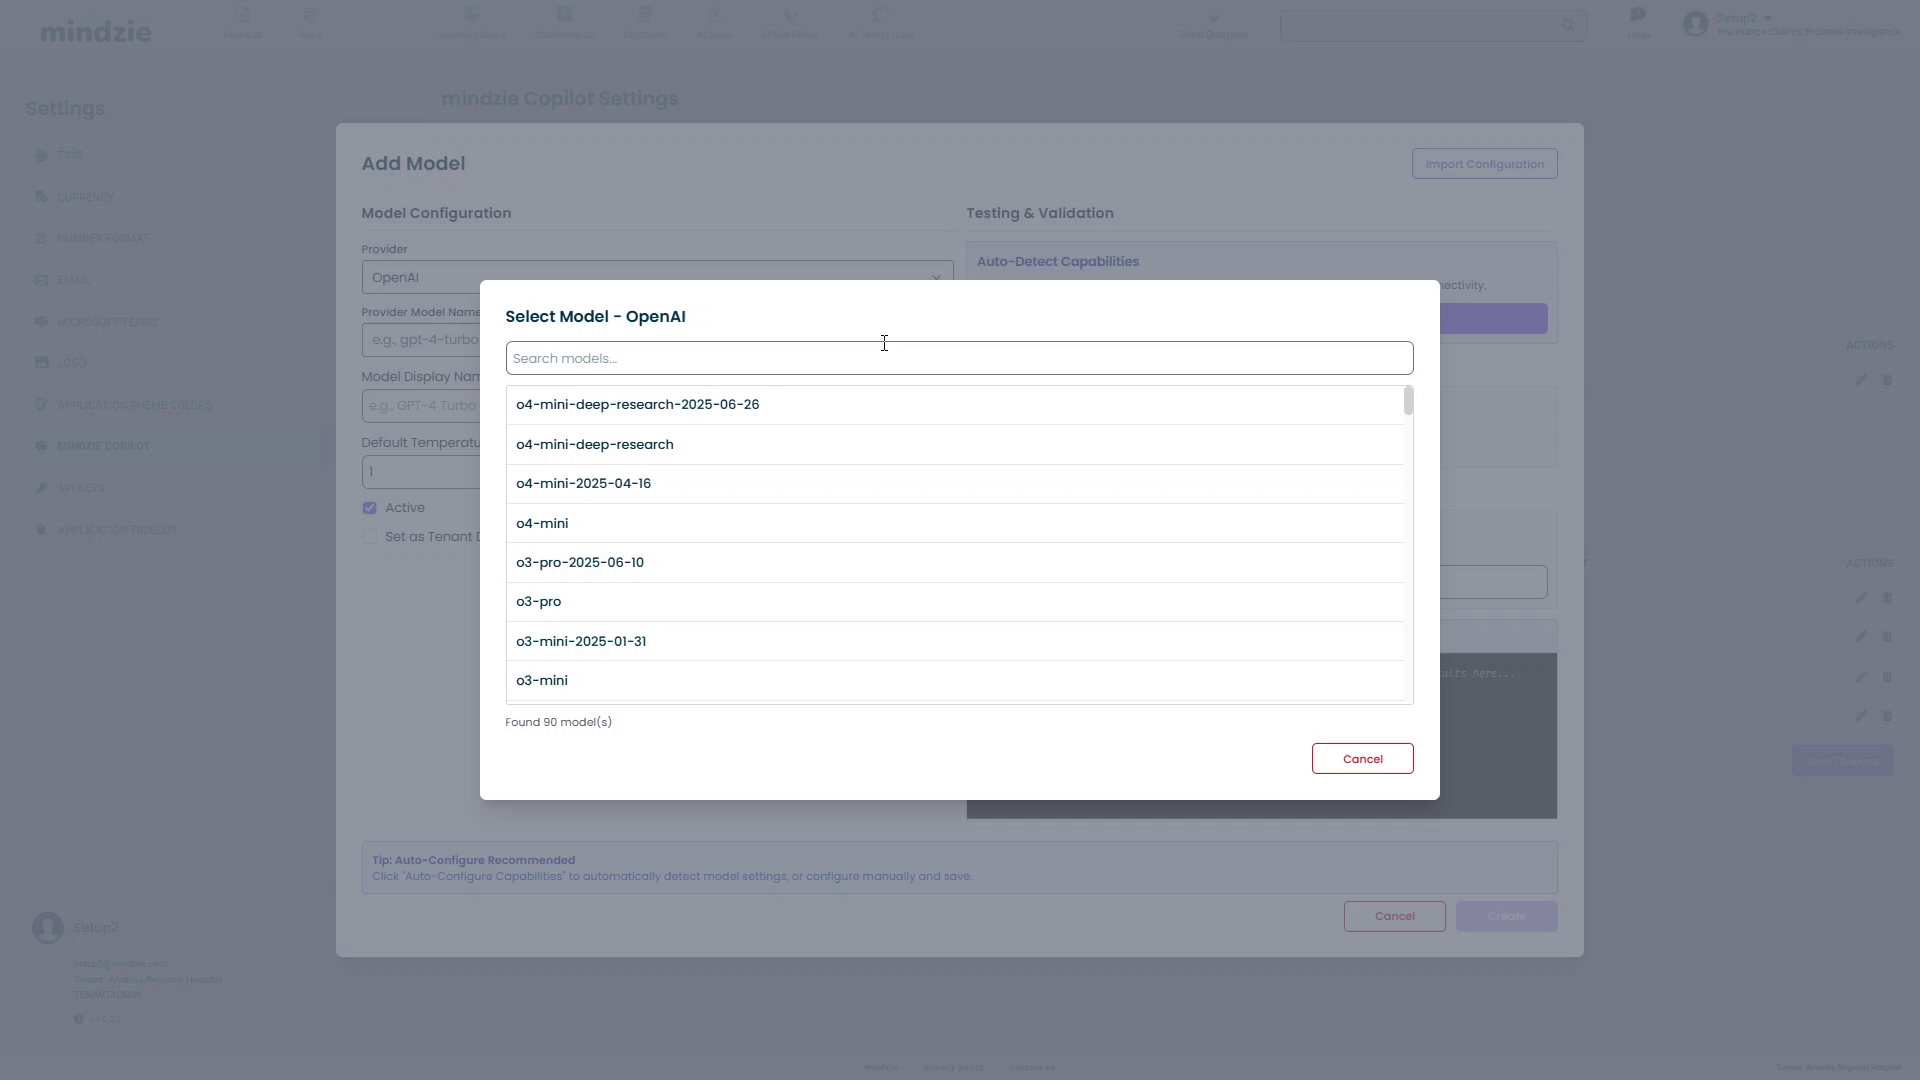
- Click on a model to select it (e.g.,
gpt-5-search-api-2025-10-14)
Note: Not all models from a provider may be suitable for chat. For example, OpenAI offers audio and embedding models that won't work with mindzieStudio copilots. Selecting an incompatible model will result in errors during use.
Option B: Manual Entry
If you know the exact model name, type it directly into the Provider Model Name field.
Examples:
gpt-4-turbogpt-4o-miniclaude-3-opus-20240229
Step 4: Configure Model Display Name
Model Display Name: Enter a friendly name that users will see
- Example:
GPT-4 Turbo (fast, cost-effective) - This name appears in the copilot interface when selecting models
Step 5: Set Default Temperature
Default Temperature: Set between 0 and 2
- Lower values (0-0.3): More deterministic, focused responses
- Medium values (0.7-1.0): Balanced creativity and consistency
- Higher values (1.0-2.0): More creative and varied responses
Default: 1 is a good starting point for most use cases
Step 6: Auto-Detect Capabilities
mindzieStudio can automatically detect what features the model supports.
- Click the Auto-Configure Capabilities button in the Testing & Validation section
- mindzieStudio will connect to the provider and test the model
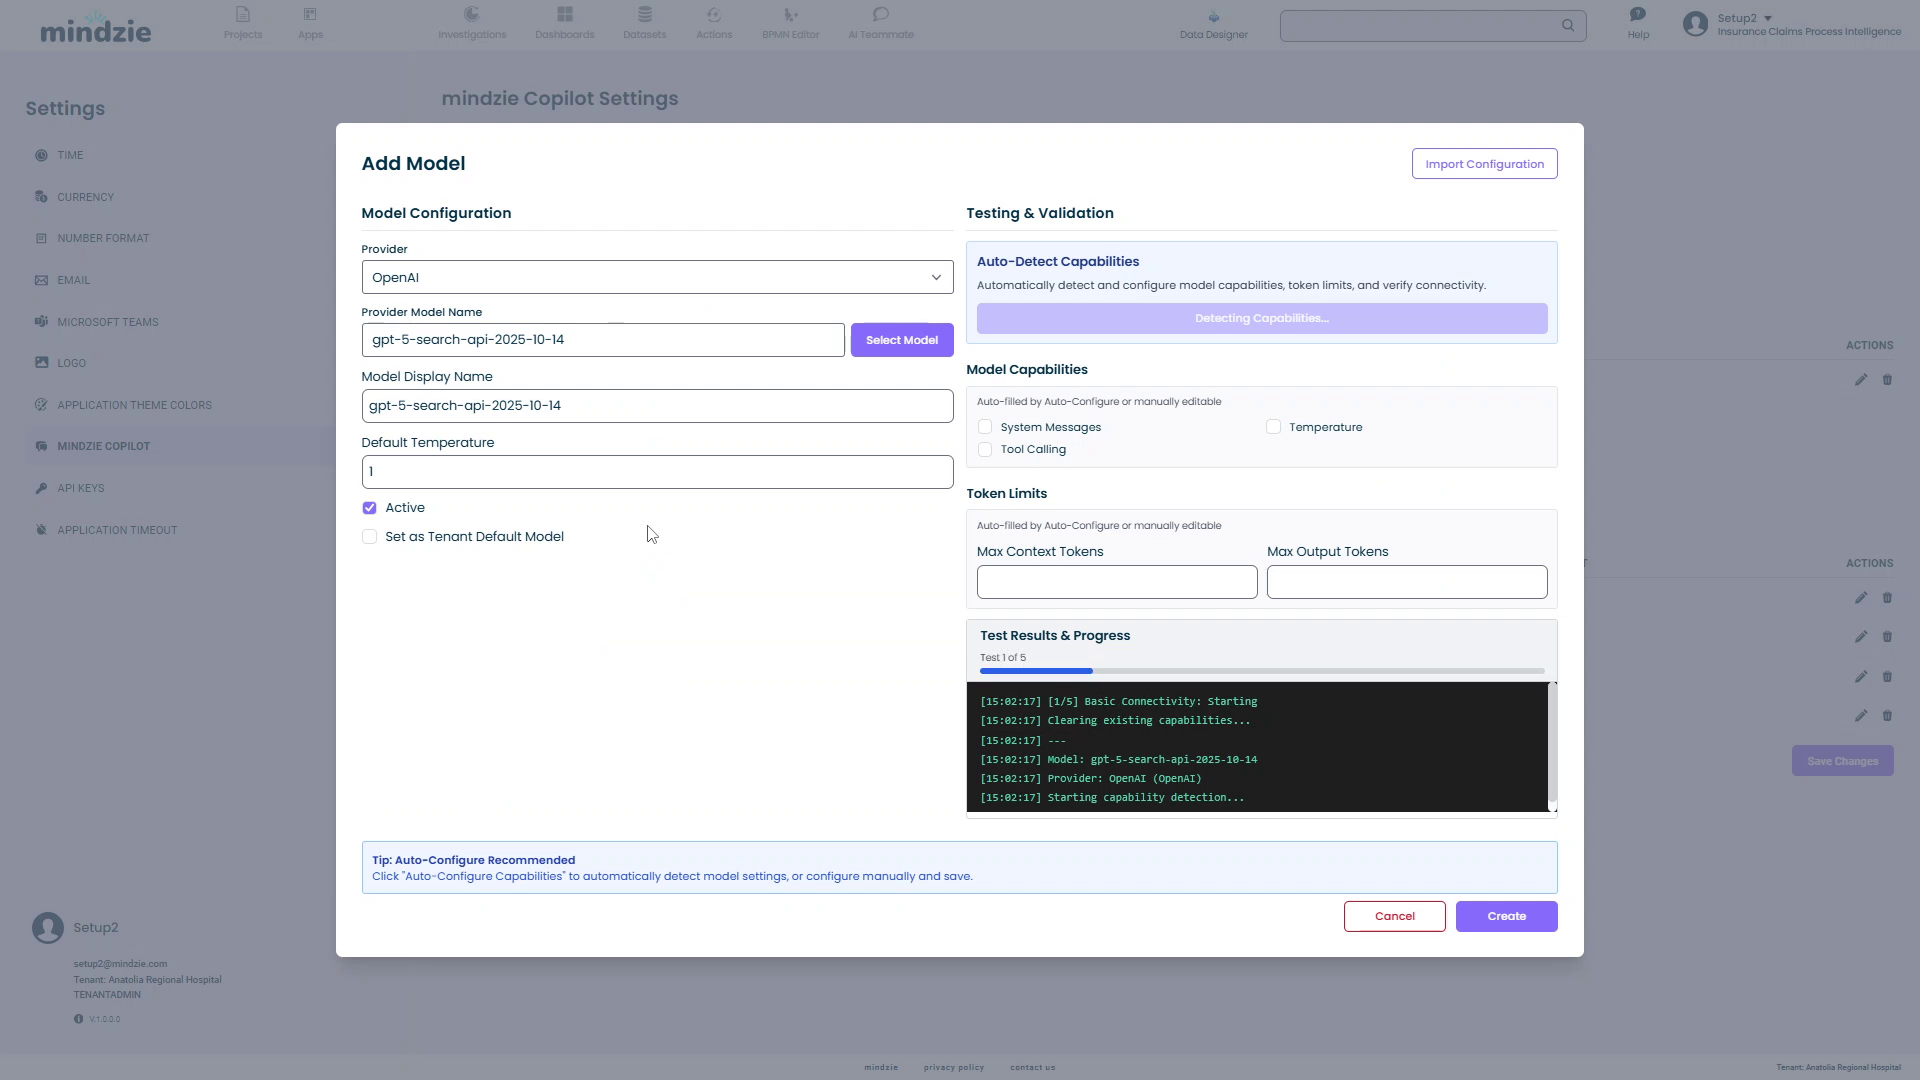
- Within seconds, the system will detect and configure:
- Token Limits: Maximum context and output tokens
- Model Capabilities: Supported features
- Temperature Support: Whether temperature parameter is available
- System Messages: Whether the model supports system messages
- Tool Calling: Whether the model can call external tools
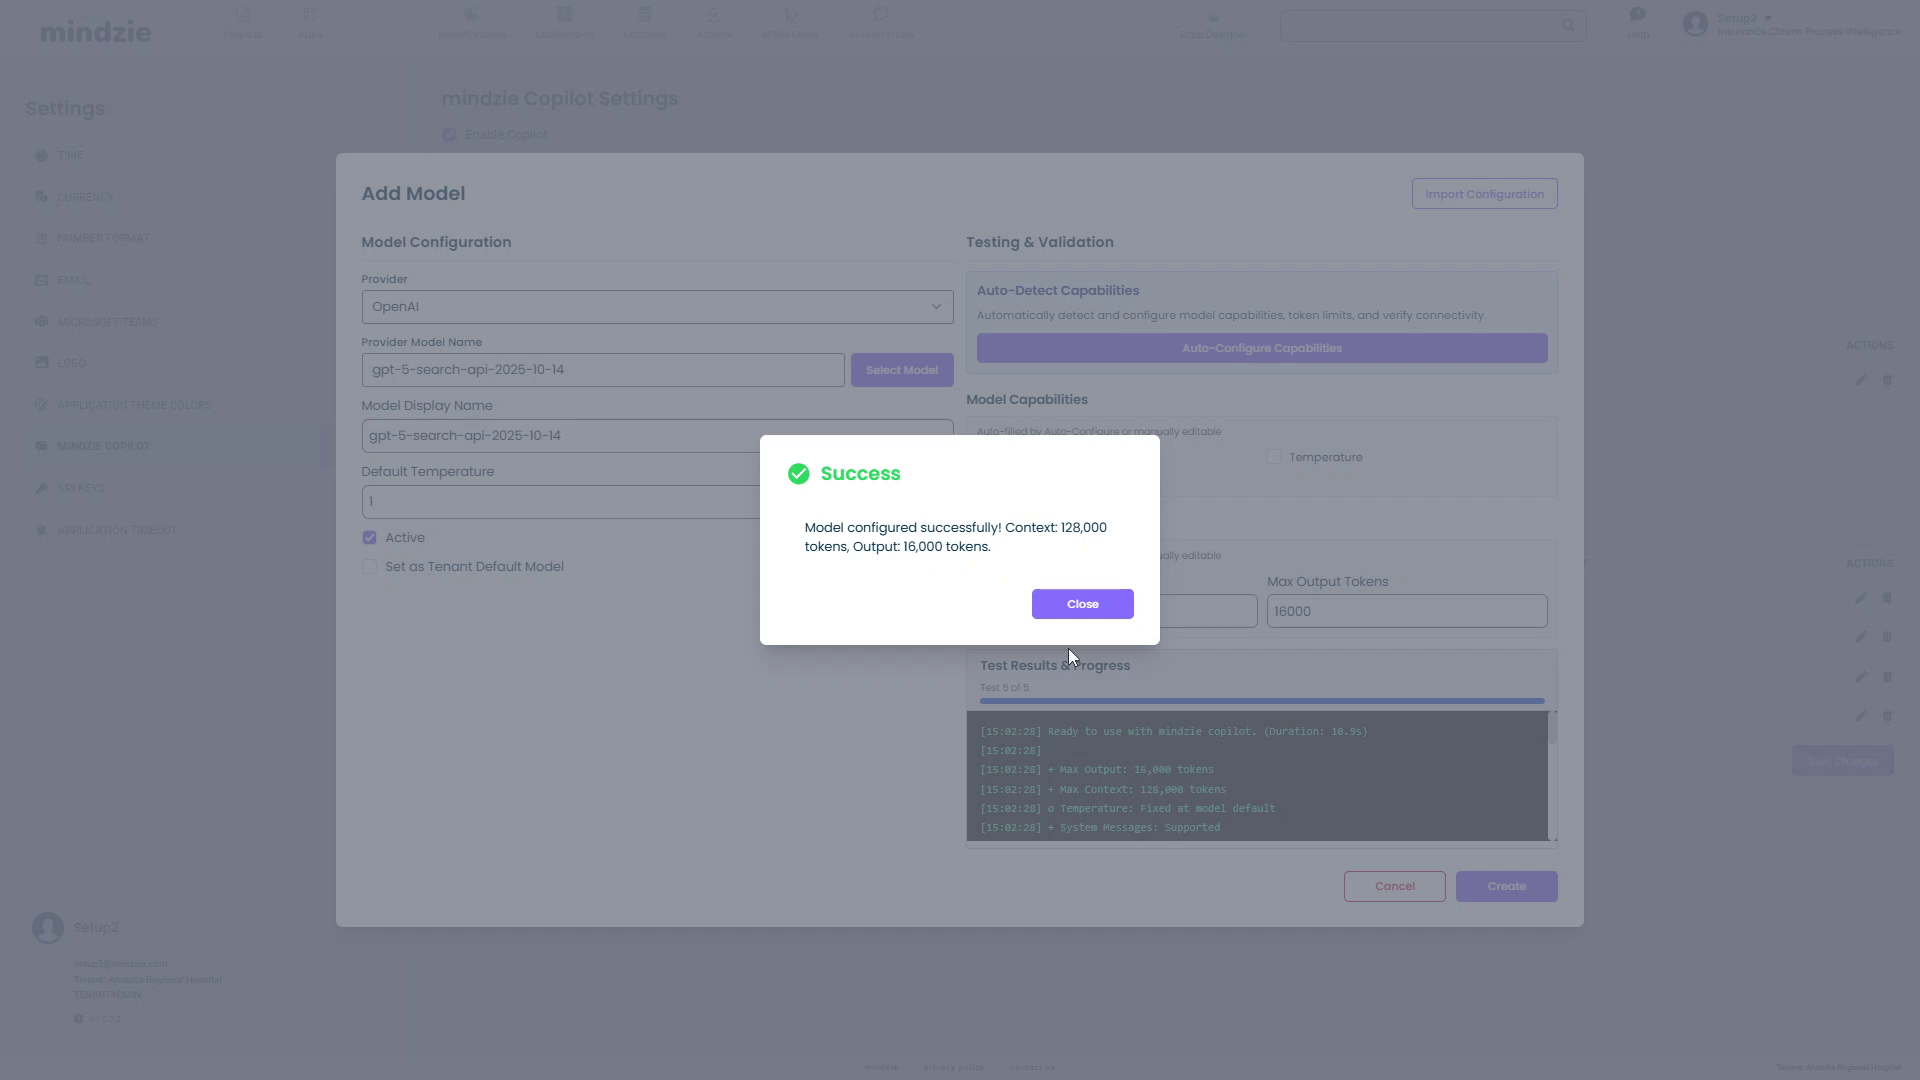
- Click Close on the success dialog
- The capabilities will be auto-filled in the form
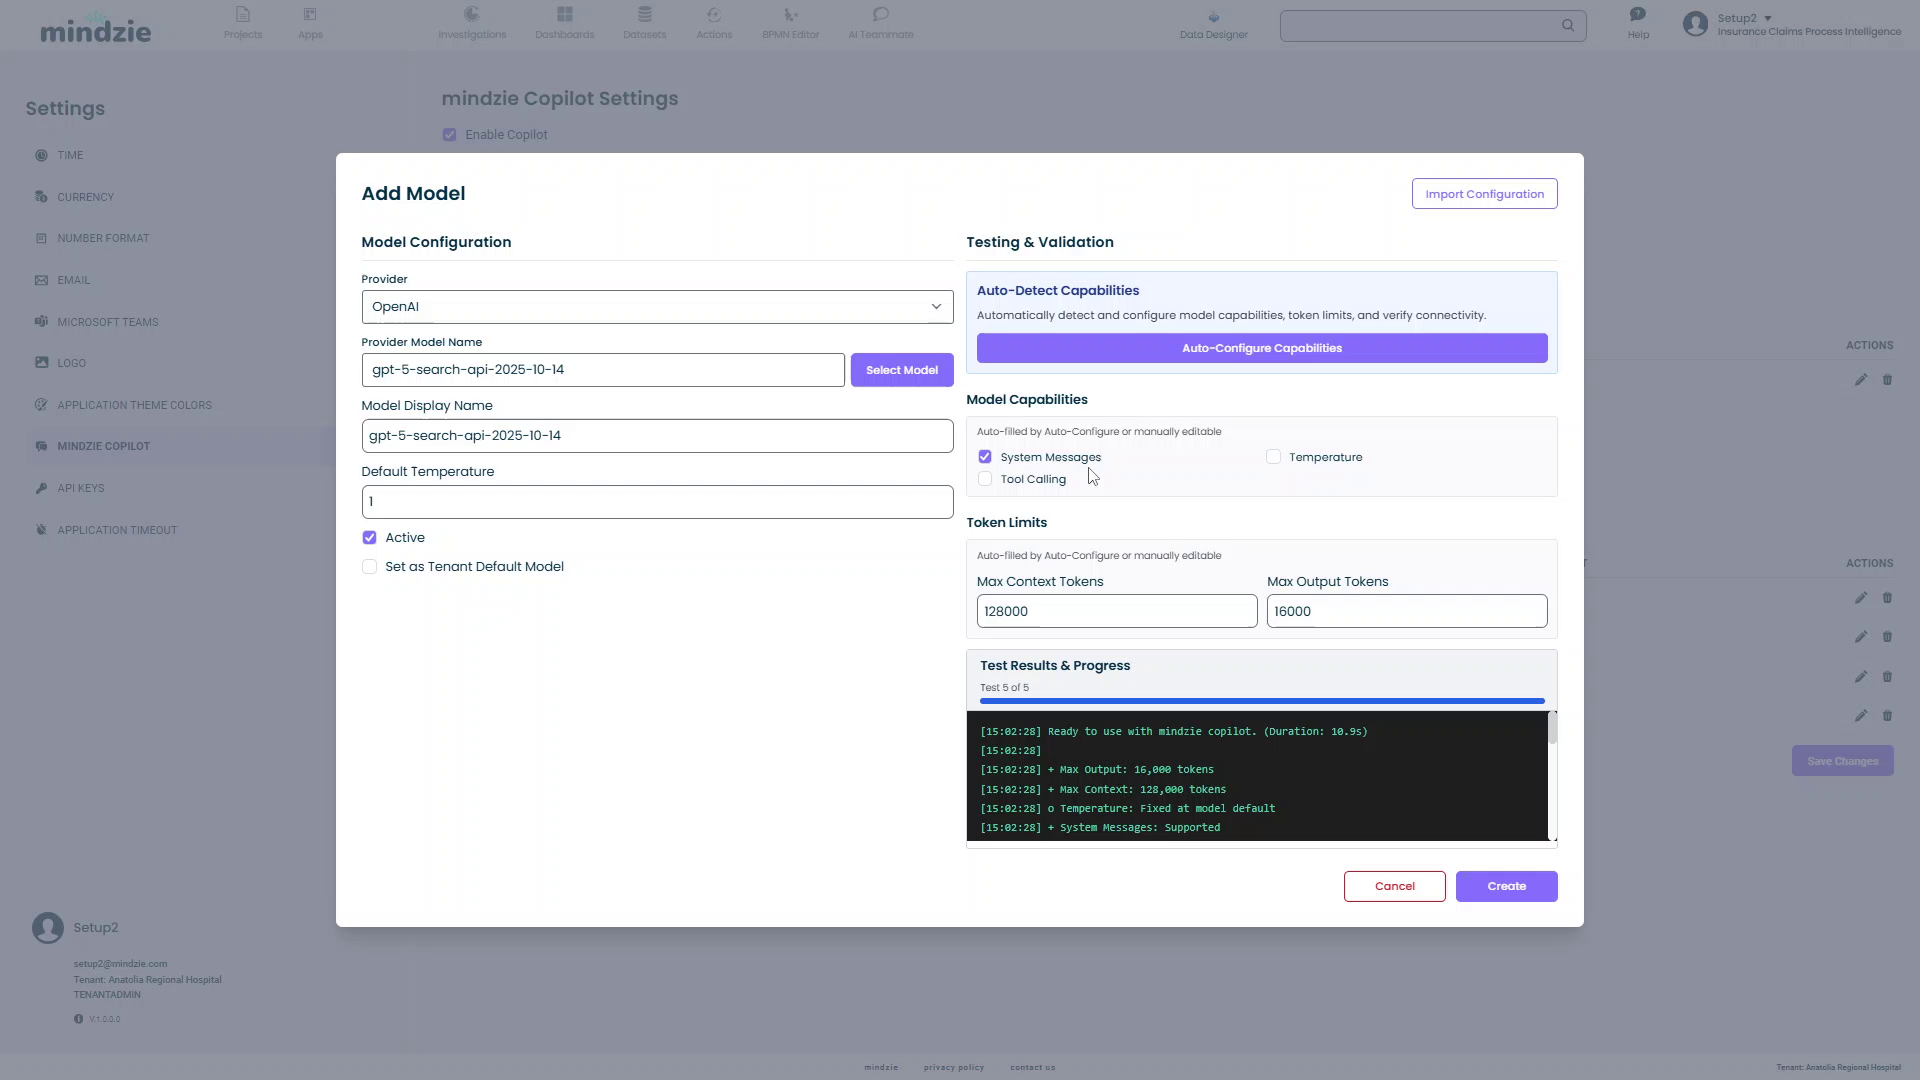
Auto-Filled Information:
- Max Context Tokens: 128,000 (in this example)
- Max Output Tokens: 16,000 (in this example)
- Detected Tier: Suggested tier for this model (Small, Agent, or Thinking)
- Model Capabilities: System Messages (checked), Temperature (unchecked in this example)
Step 7: Manual Override (Optional)
You can manually edit the auto-detected capabilities if needed.
Warning: Only override if you are certain the auto-detection is incorrect. Incorrect capability settings will cause errors when using the model.
For example:
- If you incorrectly enable Temperature for a model that doesn't support it, API calls will fail
- If you set token limits too high, requests may be rejected
Step 8: Set Model Status
Active: Check to enable the model for use
- Uncheck to temporarily disable without deleting
Set as Tenant Default Model: Check to make this the default model for all copilot assistants
- Only one model can be the tenant default
- Setting a new default will also set that model's provider as the default provider
Step 9: Create the Model
- Click the Create button
- An Information dialog will confirm the model was added successfully
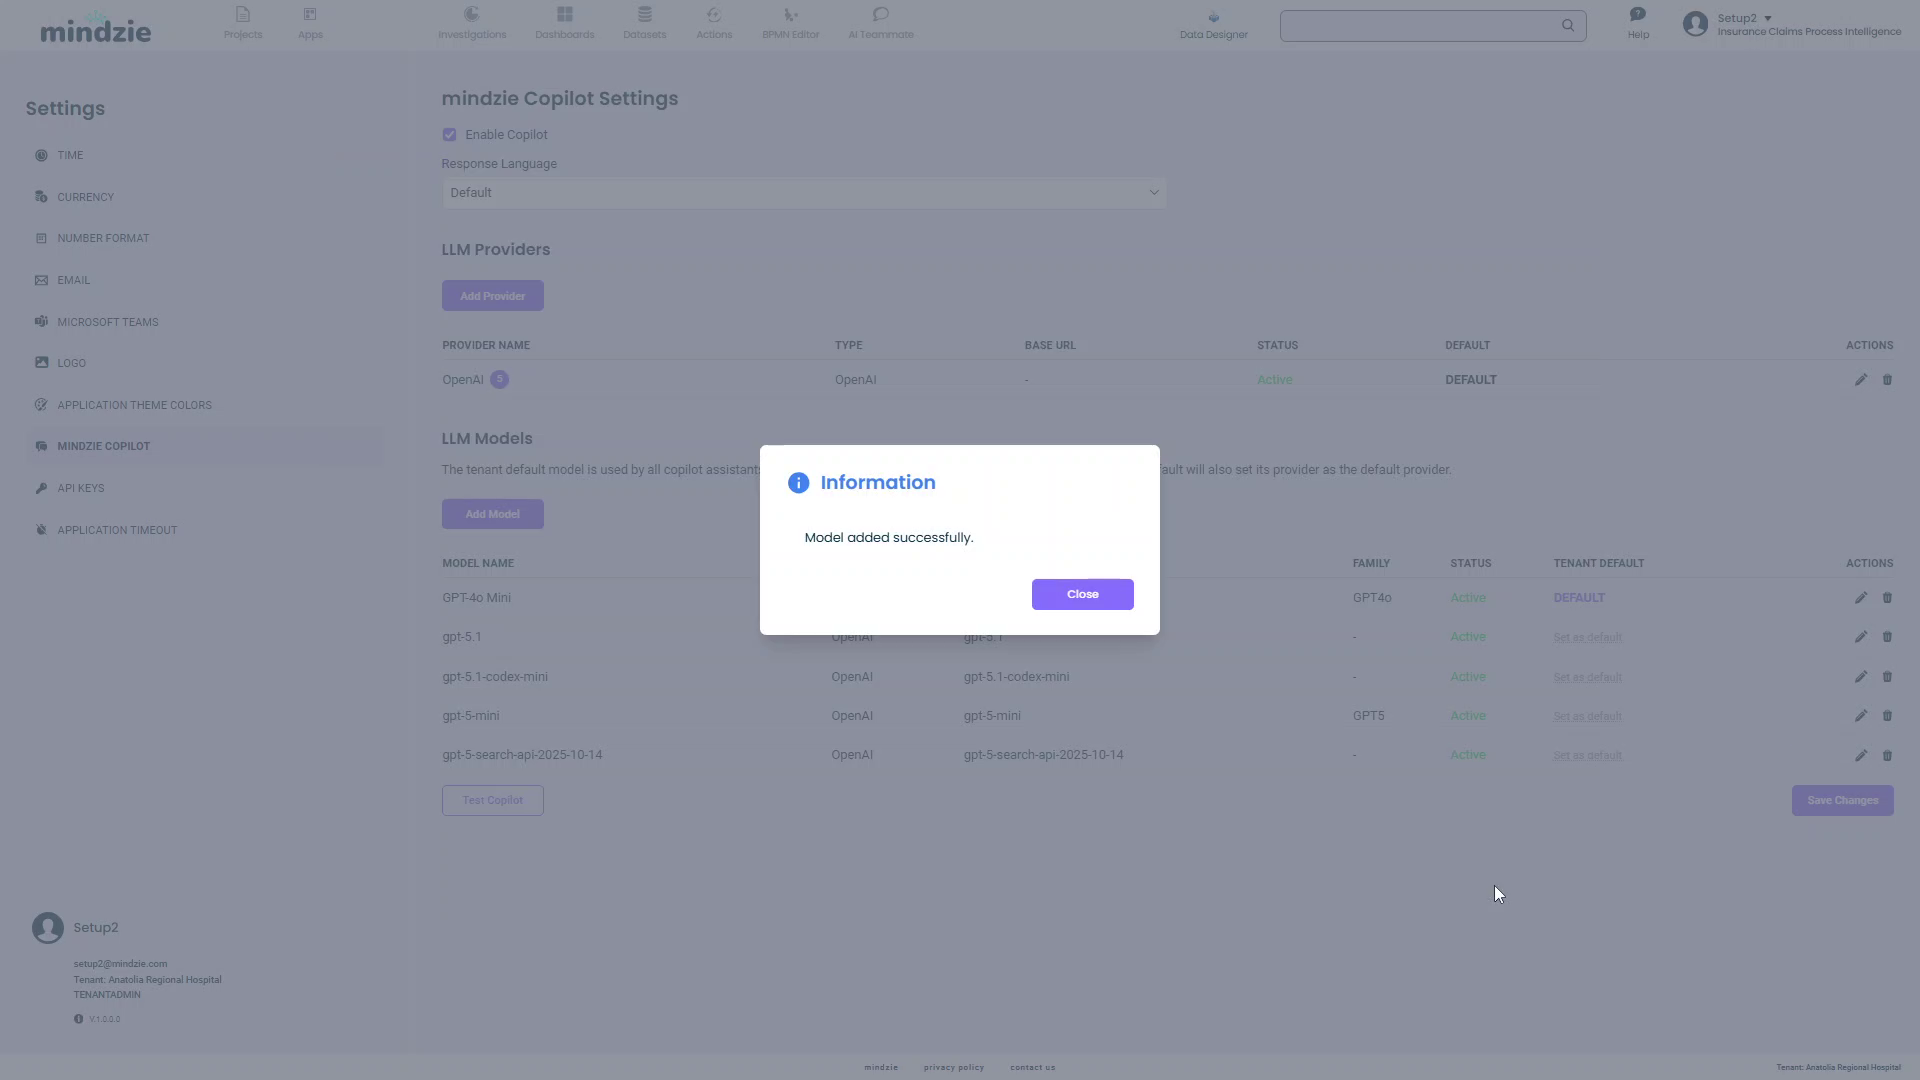
- Click Close
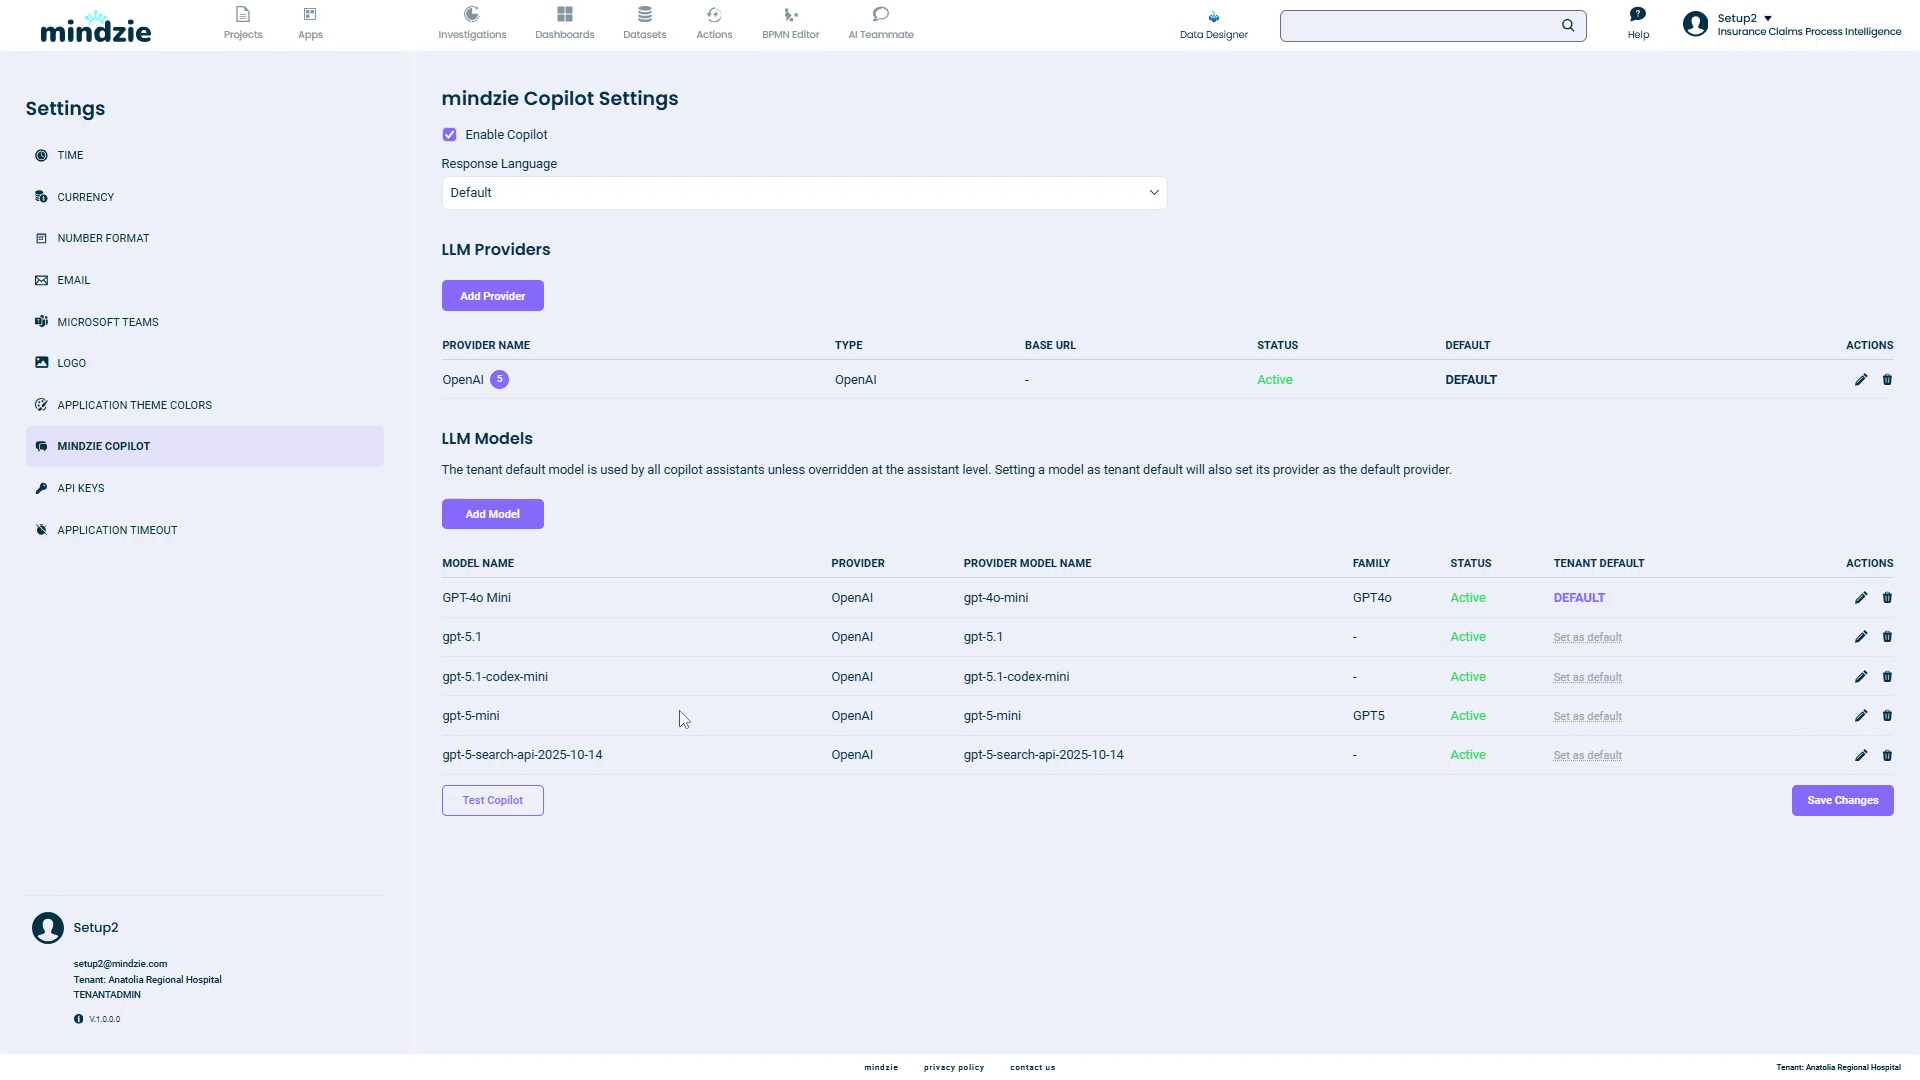
- The model now appears in the LLM Models table
Understanding the Models Table
The LLM Models table displays:
| Column | Description |
|---|---|
| Model Name | Display name you configured |
| Provider | Which provider hosts this model |
| Provider Model Name | Technical model identifier used by the API |
| Tier | Model tier: Small (fast routing tasks), Agent (complex reasoning), Thinking (extended reasoning), or Disabled |
| Status | Active or Inactive |
| Tenant Default | Shows "DEFAULT" if this is the tenant-wide default model |
| Actions | Edit or delete the model |
Managing Models
Editing a Model
To modify a model's configuration:
- Click the edit icon in the Actions column
- Update the settings in the Edit Model dialog
- Click Update to save changes
Setting a Different Default Model
To change which model is used by default:
- Edit the model you want to make default
- Check Set as Tenant Default Model
- Click Update
The previous default will automatically be unmarked.
Deleting a Model
To remove a model:
- Click the delete icon in the Actions column
- Confirm the deletion
Note: You cannot delete a model that is currently set as the tenant default. Set a different default first.
Testing Your Configuration
After configuring providers and models, test your setup:
- Navigate to a copilot-enabled feature (e.g., Investigations, AI Teammate)
- Open the copilot interface
- Verify your default model appears in the model selector
- Send a test query to confirm the model responds correctly
Supported Providers
Cloud Providers
mindzieStudio supports any OpenAI-compatible API, including:
- OpenAI: GPT-4, GPT-4 Turbo, GPT-3.5, GPT-5 (when available)
- OpenRouter: Multi-provider access to hundreds of models
- Anthropic Claude (via OpenRouter or compatible proxy)
- Grok (xAI)
- Google Gemini (via compatible API)
- Azure OpenAI Service
- Custom APIs: Any service implementing OpenAI's API specification
On-Premise Solutions
For data privacy and security, you can deploy models locally:
- LM Studio: Easy-to-use local model deployment
- Ollama: Lightweight local model serving
- vLLM: High-performance inference server
- Text Generation Inference: Hugging Face's inference server
- LocalAI: OpenAI-compatible local inference
On-Premise Setup Requirements:
- Install your chosen local inference software
- Download and load your preferred model
- Start the local server (typically on
localhost:1234orlocalhost:11434) - In mindzieStudio, add a provider with the local base URL
- Add models using the local provider
Best Practices
API Key Security
- Rotate Keys Regularly: Change API keys periodically based on your security policies
- Use Organization IDs: When available, use organization IDs to track usage and costs
- Limit Key Permissions: Use API keys with minimum required permissions
- Don't Share Keys: Each user or team should have their own API credentials
Model Selection
- Fast Models for Real-Time: Use models like
gpt-4o-minifor quick copilot responses - Thinking Models for Analysis: Use larger models like
gpt-5-search-apifor complex analysis tasks - Test Before Default: Test new models thoroughly before setting them as tenant default
- Monitor Costs: Track usage and costs per model, especially for expensive models
Provider Management
- Keep Providers Active: Only disable providers when necessary to avoid confusion
- Descriptive Names: Use clear provider names like "OpenAI Production" or "Local LM Studio Dev"
- Test Connections: Always test connections after adding or editing providers
- Multiple Providers: Configure backup providers in case your primary provider has issues
Capability Configuration
- Trust Auto-Detection: Use auto-configure capabilities whenever possible
- Don't Guess: If auto-detection fails, consult the model's documentation rather than guessing
- Verify Token Limits: Incorrect token limits can cause unexpected truncation or errors
- Update Regularly: Model capabilities may change with API updates
Troubleshooting
Connection Test Fails
If testing a provider connection fails:
- Verify API Key: Copy the key directly from your provider dashboard
- Check Base URL: Ensure the base URL is correct and includes the protocol (http:// or https://)
- Network Access: Confirm your network allows connections to the provider
- Provider Status: Check if the provider's API is experiencing downtime
- Organization ID: Remove the organization ID if not required
Model Not Appearing in Copilot
If a model doesn't appear when using copilots:
- Check Active Status: Ensure both provider and model are marked as Active
- Verify Provider: Confirm the model's provider is active
- Reload Interface: Refresh the copilot interface
- Check Permissions: Verify you have access to use AI features
Auto-Detection Fails
If auto-configure capabilities doesn't work:
- Test Provider First: Ensure the provider connection is valid
- Check Model Name: Verify the model name is correct
- API Permissions: Some APIs require special permissions for capability queries
- Manual Configuration: As a fallback, configure capabilities manually using the model's documentation
Model Errors During Use
If a model returns errors when used:
- Review Capabilities: Ensure capabilities match what the model actually supports
- Check Token Limits: Verify max context and output tokens are not set too high
- Temperature Setting: Some models don't support temperature - disable if needed
- API Quota: Check if you've exceeded your provider's rate limits or quotas
Example Configurations
Example 1: OpenAI with Multiple Models
Provider Configuration:
- Provider Type: OpenAI
- Provider Name: "OpenAI Production"
- API Key:
sk-...(your actual key) - Active: Yes
- Default Provider: Yes
Models:
Fast Model for Quick Responses
- Model Name: "GPT-4o Mini (Fast & Cheap)"
- Provider Model Name:
gpt-4o-mini - Default Temperature: 0.7
- Tenant Default: Yes
Thinking Model for Complex Analysis
- Model Name: "GPT-5 Search API (Advanced)"
- Provider Model Name:
gpt-5-search-api-2025-10-14 - Default Temperature: 1.0
- Tenant Default: No
Example 2: On-Premise with LM Studio
Provider Configuration:
- Provider Type: LM Studio
- Provider Name: "Local LM Studio"
- API Key: (leave empty or use dummy value)
- Base URL:
http://localhost:1234/v1 - Active: Yes
- Default Provider: Yes
Model:
- Model Name: "Llama 3.1 70B (Local)"
- Provider Model Name:
llama-3.1-70b-instruct - Default Temperature: 0.8
- Tenant Default: Yes
Example 3: Mixed Cloud and On-Premise
Use multiple providers for flexibility:
Providers:
- OpenAI (cloud) - for production workloads
- LM Studio (local) - for development and sensitive data
Models:
- Default: OpenAI GPT-4o Mini (production)
- Secondary: Local Llama 3.1 (development/testing)
Related Documentation
- Using Copilots in Investigations - Learn how to use AI assistants for process analysis
- AI Teammate - Configure and work with your AI teammate
- Administration Settings - Other tenant-wide configuration options
Support
If you encounter issues configuring AI models:
- Email: support@mindzie.com
- Documentation: Consult your AI provider's API documentation for model names and capabilities
- Testing: Always test provider connections and model responses before setting as default